Ways To Stencil Concrete Patio In El Cajon
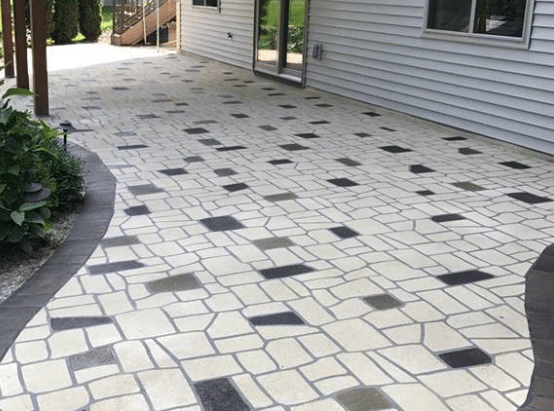 Installing a concrete patio can boost a home’s value and curb appeal. Stencils are a fantastic option for adding a personal touch to your patio layout. Concrete patio stencilling in seven simple stages.
- When deciding how to stencil a concrete patio, the colour of paint or stain you use will have a significant impact on the final result. Choose colours that will stand out against the patio’s background and are durable enough to withstand the elements year after year.
- To ensure the paint adheres well and lasts as long as possible, it is crucial to properly prepare the surface before commencing the painting project. To do this, it may be necessary to use a power washer to get rid of dirt and grease, bleach away mould and moss, and fill up any cracks or holes.
- Pick out a patio design and sketch it out using a ruler and some chalk. Paintings with straight and regular lines will be less of a challenge if you use this technique.
- Cutting plastic into precise shapes and sizes may be necessary if you plan on creating intricate designs on your patio. The only tools you’ll need are scissors or a craft knife and some exact measurements.
- Apply masking tape or another adhesive material along each edge of your stencil to keep it in place while you paint.
- Once you have your stencils in place, you may paint or stain the areas that have been marked off, taking care to apply even pressure so as not to smudge the lines.
- Carefully peel the stencils off the patio tiles when you’re done and wash them so you may reuse them. Once the stencil design has cured, your concrete patio will look great and serve its intended purpose.
FAQ’s
Is Stenciling Existing Concrete Possible?
Directly applying a stencil on top of already-poured concrete is a viable option. Getting rid of grease and filth, filling up any gaps, and washing with a power washer are all necessary steps in surface preparation that will ensure the paint or stain adheres effectively and lasts for years.
How Do You Stencil A Concrete Slab?
You can stencil on a concrete floor by first applying a protective layer and then tracing your desired design with a ruler or chalk. To achieve the desired effect, plastic pieces may need to be cut into specific shapes and sizes. Masking tape or other adhesive materials can be used to hold stencils in place while you cover the desired areas with a paintbrush or roller.
How Long Does It Take For Patching Compound To Dry?
It is important to consider how long patching compound takes to dry when undertaking home decor projects. This is because it affects the timeline of your project and the quality of the finish. Patching compound is used for repairing cracks, gouges, holes, and other defects on a variety of surfaces such as walls, ceilings, and floors. It typically takes 24 hours for patching compound to dry, but the exact amount of time will depend on several factors. The type of compound you are using is an important factor in determining how long it takes to dry. Some compounds are formulated to dry faster than others, while some may take longer. Additionally, the size and depth of the repair area can affect the drying time. Larger areas with deeper repairs may take longer to dry than smaller ones.
How To Install Stenciled Patio For Your Home Improvement?
It is no secret that a stenciled patio can be a great addition to any home improvement project. Not only do they add beauty and value, but also offer protection from the elements. For business owners a well-designed patio can help create an inviting atmosphere for customers and attract more business. Installing a stenciled patio requires careful planning and attention to detail. Before you begin, measure the area that you want to cover with the patio. This will help determine the materials needed for the job such as concrete pavers, sand, and gravel. You should also consider any drainage issues or safety concerns before beginning construction. Once these considerations have been made, it is time to start stenciling. A set of stencils and a paintbrush are needed to create the desired design. Create your own designs or find templates online. Once you have selected a design, use the brush to fill in the template on the patio surface with paint that is designed for outdoor use. This can be done free-hand or with a stenciling kit. After the paint is completely dry, use a sealer to protect the design and add extra durability. With this final step, your stenciled patio is complete! Installing a stenciled patio can be a great way to spruce up any home or business.
Conclusion
The use of stencils is a fantastic technique to give your patio a one-of-a-kind, personalised look. It’s possible to get stunning, long-lasting results with just the right amount of preparation, materials, and expertise. For more information, contact Concrete Contractor El Cajon at (619) 473-4433.